Raspberry Pi : How to access the Internet using GSM / GPRS Modem (SIM900/SIM800)
Here we are with yet another post on our favorite Pi. We had many different posts on Raspberry Pi as well as on GSM-GPRS connectivity. So what do we have here new? What we discussed so far focused either on GSM connectivity or TCP/IP connection over GPRS, here we intend to tether our Raspberry Pi to the internet through a GPRS cellular data connection. Lets see how its done..
Hardware Requirements
- Raspberry Pi 3
- rhydoLABZ GSM/GPRS Modem
- Connecting Wires
- 5v 1A power source (For GSM modem)
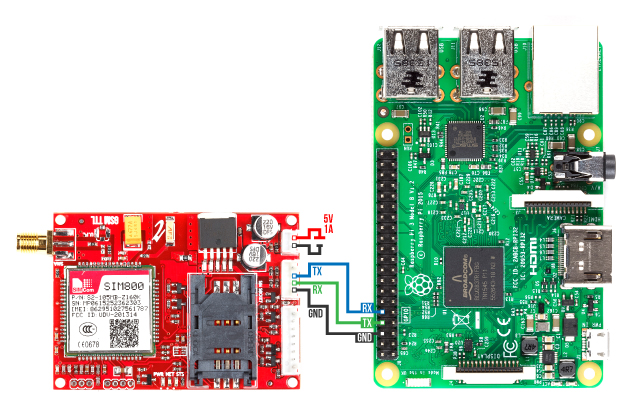
Make the connections as shown in the figure above. Provide separate power source (5V 1A) to the GSM modem for proper functioning as it drives much current. Insert a 2G activated SIM card, with working data connection, and power up the modules. It will take a few seconds for the SIM to get registered to the network. Now we need to check the communication between the RPi and the modem. For which, we make use of a python code that transmits an AT command and verifies whether an OK is received as acknowledgement. Open a python shell using sudo idle command and create a new file. Copy the code shown below, save and run the code.
If you are new to Raspberry Pi, we suggest reading this post before you proceed.
|
1 2 3 4 5 6 7 8 9 10 11 12 |
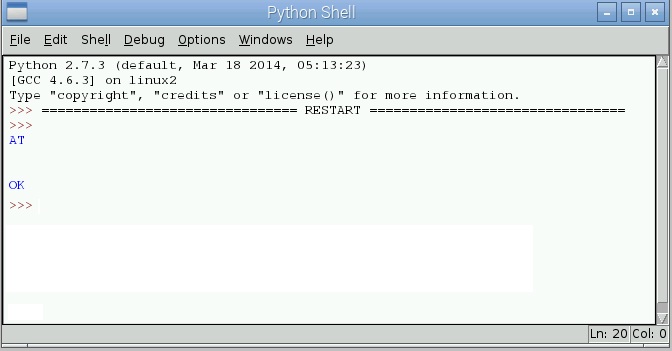
import serial import os, time # Enable Serial Communication port = serial.Serial("/dev/ttyS0", baudrate=9600, timeout=1) # Transmitting AT Commands to the Modem # '\r\n' indicates the Enter key port.write('AT'+'\r\n') rcv = port.read(10) print rcv |
Run the code and if the connections are all working good, then we will receive an OK acknowledgement in the python shell.
PPP Configuration
PPP or Point to Point Protocol establishes a Node to Node communication using serial interface. We make use of this, while accessing serial data connection on a PC. Here, using the serial connection, proper commands and PPP, we are about to access the internet on Pi.
APN
An Access Point Name (APN) is the name of a gateway between a GSM/GPRS network and the internet. The APN of the cellular network that we are using, must be know to us. You can either ask it out on google or contact the service provider. In this example, we have used IDEA connection and for the APN we asked it on Google.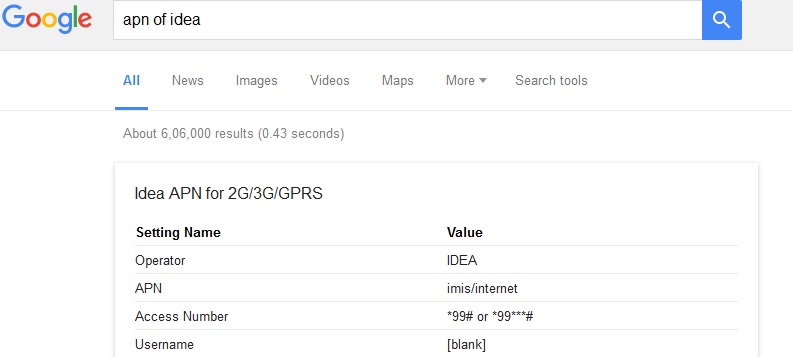 Installation
The first step is to disable the kernel’s use of the hardware serial connection. By default, when the Raspberry Pi boots, it will use the serial connection to produce messages from the kernel and it will confuse the GSM modem. Follow the steps below
From Menu Select Preferences –> Raspberry Pi Configuration.  In this window, Select the interfaces tab and disable the serial option.
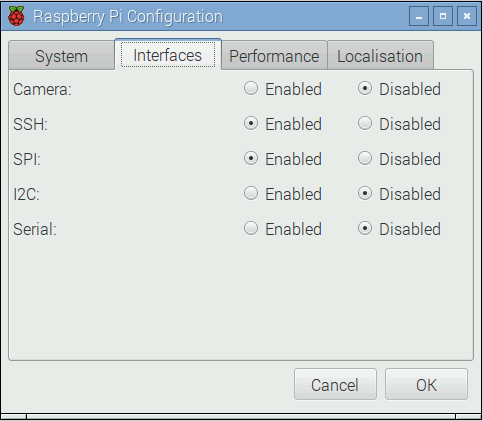 The next process is to install PPP Software. Make a suitable internet connection on the RPi by means of an Ethernet cable or WiFi. Open the LX Terminal and type:
|
1 |
sudo apt-get update |
|
1 |
sudo apt-get install ppp screen elinks |
After the installation we have to create a new PPP peer configuration. For this operation, we should login as root by entering sudo -i in the terminal and navigate to the peers directory,
|
1 |
cd /etc/ppp/peers/ |
Now open a new file rnet in a text editor by executing:
nano rnet
Copy the code shown below to the new file.
|
1 2 3 4 5 6 7 8 9 10 11 12 13 14 15 16 17 18 19 20 21 22 23 24 25 26 27 28 29 |
#imis/internet is the apn for idea connection connect "/usr/sbin/chat -v -f /etc/chatscripts/gprs -T imis/internet" # For Raspberry Pi3 use /dev/ttyS0 as the communication port: /dev/ttyS0 # Baudrate 115200 # Assumes that your IP address is allocated dynamically by the ISP. noipdefault # Try to get the name server addresses from the ISP. usepeerdns # Use this connection as the default route to the internet. defaultroute # Makes PPPD "dial again" when the connection is lost. persist # Do not ask the remote to authenticate. noauth # No hardware flow control on the serial link with GSM Modem nocrtscts # No modem control lines with GSM Modem local |
From the above file, two parameters must be changed which depends on the modules used. In the beginning command, connect, after the section -T, the APN of the service provider should be given. Here we have used the APN of Idea (imis/internet).
Then comes the communication port, as we have used Pi 3 in our exapmle , the port name is /dev/ttyS0. Save the configuration file by pressing ctrl+x. This configuration file controls the options that will be set by PPPD, when the GSM Modem PPP connection is created. You can find a description of all the options in the PPPD main page.
In the above file, with in the line connect, a chat script is mentioned. To see this file, enter:
|
1 |
<strong>nano /etc/chatscripts/gprs</strong> |
This will open a new file, which is not needed to be edited and this explains how a GPRS connection is created. If the SIM card needs a PIN to unlock, un comment the line AT+CPIN=1234 and set the pin instead of 1234. Save the file and exit.
Next is to establish the connection. Before that make sure, all the steps described above are executed with no errors and proper wiring connections are also made.
Type, sudo pon rnet for creating the connection and it will exit with no response shown in the Lx terminal but the PPPD should be setting up the connection. To show the log for PPPD type,
|
1 |
<strong>cat /var/log/syslog | grep pppd</strong> |
It will shows more messages and if the connection was established successfully, we can see the messages at the end as shown in the figure: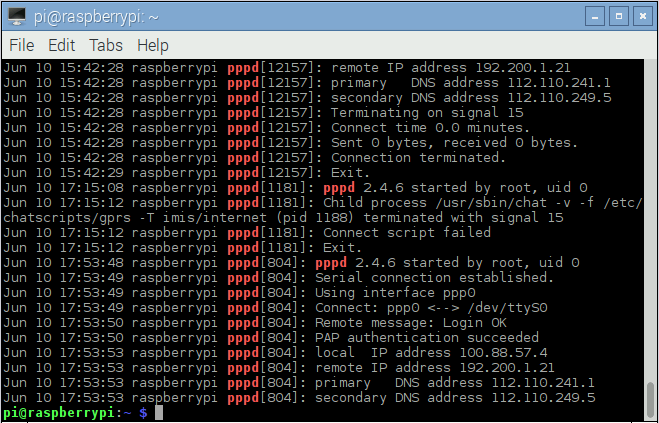 In the terminal type ifconfig and enter.
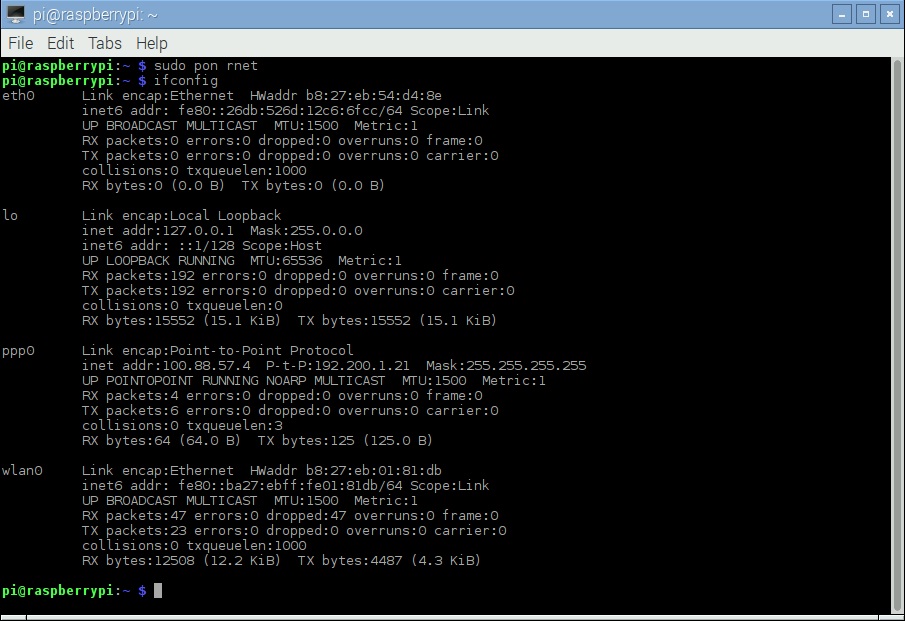 A new section PPP0 can be seen with the IP 192.200.1.21. In the modem the blue led will blink fast continuously as the connection in ON. To close the connection, type: sudo poff rnet. Well, rhydoLABZ modem is all you need now to start browsing on your Pi. The working is much similar to any of those commonly available internet dongles. We have made these to work with the PI, why dont we go for the same on a desktop PC?? We hope to have a post that will explain all of it. 🙂 Keep reading our posts, and feel free to comment/share 😉
Leave a Reply
You must be logged in to post a comment.