PIC Programmer Lite(MPLAB Compatible)
This is a low cost MPLAB Compatible PIC programmer.The programmer will detect automatically as Pickit2 programmer by MPLAB. It can program all 5Volt PIC micro controllers including the PIC16F84A ,PIC16F628, PIC18F458 and PIC16F877A .
") PIC Programmer Lite as a Debugger allows in-circuit debugging on selected PIC microcontrollers.In circuit debugging allows the designer to run, halt and single step the program while the PIC microcontroller is embedded in the hardware. Once halted, the file registers may be examined and modified.This greatly assists the designer in debugging the firmware and hardware together. Alternatively PIC Programmer Lite can also be used as a USB-UART tool.This feature allows PIC Programmer Lite to be used as a serial UART terminal interface for communicating with a PIC microcontroller using the PICkit 2 Application Program. Using PIC Programmer Lite, we can use about 95% of our pic’s memory. If we program with a boot-loader we will have to reserve separate memory just to fuse boot-loader.
PIC Programmer Lite as a Debugger allows in-circuit debugging on selected PIC microcontrollers.In circuit debugging allows the designer to run, halt and single step the program while the PIC microcontroller is embedded in the hardware. Once halted, the file registers may be examined and modified.This greatly assists the designer in debugging the firmware and hardware together. Alternatively PIC Programmer Lite can also be used as a USB-UART tool.This feature allows PIC Programmer Lite to be used as a serial UART terminal interface for communicating with a PIC microcontroller using the PICkit 2 Application Program. Using PIC Programmer Lite, we can use about 95% of our pic’s memory. If we program with a boot-loader we will have to reserve separate memory just to fuse boot-loader.
")
Note: This programmer is not recommended for low voltage(3V) microcontrollers.
Features :
- USB Connection (cable Included)
- Does not require external power supply
- 100% compatible with Microchip’s MPLAB IDE (Pickit2)
- Compact and handy design
- Both RJ11 connector and ICSP 6PIN Connector for programming.
Device Support List :
Note: This list shows support for the PICkit 2 Programmer software application. It does not show support for using the PIC Programmer Lite within MPLAB IDE. To know if your device is supported by MPLAB IDE, Ensure that your device is programmable at 5V, because PIC Programmer Lite is not designed to program devices not operable at 5V (eg: PIC16LFXX,PIC18LFXX, dsPIC, PIC24, PIC32). Warning: Do not program the following device series with PIC Programmer Lite. As they may potentially damage your device permanently (PIC1xLFxx Series, dsPIC series, PIC24 Series, PIC32 series)
+ Indicates parts that require 4.75V minimum VDD for programming. PIC Programmer Lite may not be able to generate sufficiently high VDD, so an external 5.0v power supply may be required.
# Indicates Midrange parts that support low Vdd programming
Baseline Devices![]() PIC10F200 PIC10F202 PIC10F204 PIC10F206
PIC10F200 PIC10F202 PIC10F204 PIC10F206
PIC10F220 PIC10F222
PIC12F508 PIC12F509 PIC12F510 PIC12F519
PIC16F505 PIC16F506 PIC16F526
PIC16F54 PIC16F57 PIC16F59
Midrange/Standard Devices![]() >> ‘LF’ versions of PIC16 family devices are “not” supported
>> ‘LF’ versions of PIC16 family devices are “not” supported
PIC12F609 PIC12HV609
PIC12F615 PIC12HV615
PIC12F629 PIC12F635# PIC12F675 PIC12F683#
PIC16F610 PIC16HV610 PIC16F616 PIC16HV616
PIC16F627 PIC16F628 PIC16F639
PIC16F627A PIC16F628A PIC16F648A
PIC16F630 PIC16F631 PIC16F636# PIC16F676
PIC16F677 PIC16F684# PIC16F685# PIC16F687#
PIC16F688# PIC16F689# PIC16F690#
PIC16F72+
PIC16F73+ PIC16F74+ PIC16F76+ PIC16F77+
PIC16F716
PIC16F737+ PIC16F747+ PIC16F767+ PIC16F777+
PIC16F785 PIC16HV785
PIC16F84A PIC16F87# PIC16F88#
PIC16F818# PIC16F819#
PIC16F870 PIC16F871 PIC16F872
PIC16F873 PIC16F874 PIC16F876 PIC16F877
PIC16F873A PIC16F874A PIC16F876A PIC16F877A
PIC16F882#
PIC16F883# PIC16F884# PIC16F886# PIC16F887#
PIC16F913# PIC16F914# PIC16F916# PIC16F917#
PIC16F946#
PIC18 Devices![]() >> ‘LF’ versions of PIC18 family are “not” supported
>> ‘LF’ versions of PIC18 family are “not” supported
PIC18F242 PIC18F252 PIC18F442 PIC18F452
PIC18F248 PIC18F258 PIC18F448 PIC18F458
PIC18F1220 PIC18F1320 PIC18F2220
PIC18F1230 PIC18F1330 PIC18F1330-ICD
PIC18F2221 PIC18F2320 PIC18F2321 PIC18F2331
PIC18F2410 PIC18F2420 PIC18F2423 PIC18F2431
PIC18F2450 PIC18F2455 PIC18F2458 PIC18F2480
PIC18F2510 PIC18F2515 PIC18F2520 PIC18F2523
PIC18F2525 PIC18F2550 PIC18F2553 PIC18F2580
PIC18F2585
PIC18F2610 PIC18F2620 PIC18F2680 PIC18F2682
PIC18F2685
PIC18F4220 PIC18F4221 PIC18F4320 PIC18F4321
PIC18F4331 PIC18F4410 PIC18F4420 PIC18F4423
PIC18F4431 PIC18F4450 PIC18F4455 PIC18F4458
PIC18F4480
PIC18F4510 PIC18F4515 PIC18F4520 PIC18F4523
PIC18F4525 PIC18F4550 PIC18F4553 PIC18F4580
PIC18F4585
PIC18F4610 PIC18F4620 PIC18F4680 PIC18F4682
PIC18F4685 PIC18F6310 PIC18F6390 PIC18F6393
PIC18F6410 PIC18F6490 PIC18F6493 PIC18F6520
PIC18F6525 PIC18F6527
PIC18F6585 PIC18F6620 PIC18F6621 PIC18F6622
PIC18F6627 PIC18F6628 PIC18F6680 PIC18F6720
PIC18F6722 PIC18F6723
PIC18F8310 PIC18F8390 PIC18F8393 PIC18F8410
PIC18F8490 PIC18F8493
PIC18F8520 PIC18F8525 PIC18F8527 PIC18F8585
PIC18F8620 PIC18F8621 PIC18F8622 PIC18F8627
PIC18F8628
PIC18F8680 PIC18F8720 PIC18F8722 PIC18F8723
PIC18F_J_ Devices![]() PIC18F24J10
PIC18F24J10
PIC18F24J11 PIC18F24J50
PIC18F25J10
PIC18F25J11 PIC18F25J50
PIC18F26J11 PIC18F26J50
PIC18F44J10 PIC18F44J11 PIC18F44J50
PIC18F45J10
PIC18F45J11 PIC18F45J50
PIC18F46J11 PIC18F46J50
PIC18F63J11 PIC18F63J90 PIC18F64J11 PIC18F64J90
PIC18F65J10 PIC18F65J11 PIC18F65J15 PIC18F65J50
PIC18F65J90
PIC18F66J10 PIC18F66J11 PIC18F66J15 PIC18F66J16
PIC18F66J50 PIC18F66J55 PIC18F66J60 PIC18F66J65
PIC18F66J90
PIC18F67J10 PIC18F67J11 PIC18F67J50 PIC18F67J60
PIC18F67J90
PIC18F83J11 PIC18F83J90 PIC18F84J11 PIC18F84J90
PIC18F85J10 PIC18F85J11 PIC18F85J15 PIC18F85J50
PIC18F85J90
PIC18F86J10 PIC18F86J11 PIC18F86J15 PIC18F86J16
PIC18F86J50 PIC18F86J55 PIC18F86J60 PIC18F86J65
PIC18F86J90
PIC18F87J10 PIC18F87J11 PIC18F87J50 PIC18F87J60
PIC18F87J90
PIC18F96J60 PIC18F96J65 PIC18F97J60
PIC18F_K_ Devices![]() PIC18F13K22 PIC18F14K22
PIC18F13K22 PIC18F14K22
PIC18F13K50 PIC18F14K50
PIC18F14K50-ICD
PIC18F23K20 PIC18F24K20 PIC18F25K20 PIC18F26K20
PIC18F43K20 PIC18F44K20 PIC18F45K20 PIC18F46K20
Pin layout :
 Pin Description :
The PIC Programmer Lite (MPLAB Compatible) unit connects as follows :
 PWR Power is applied to the PIC Programmer Lite via the USB port
- TGTP The PIC Programmer Lite is powering the target device
- BUSY The PIC Programmer Lite is busy with a function in progress, such as programming
 How to Test ?
Package includes:
- PIC Programmer Lite
- USB cable
- RJ11 cable for programming
- 6PIN ICSP Connector
The PIC Programmer uses a USB port for power and connection to the computer, as opposed to the traditional serial port, eliminating the need for a separate power supply. It will automatically power the circuit ,if the target Controller is not powered.
 Power up the PIC programmer Lite , PWR LED glows.
Selecting PIC Programmer Lite(MPLAB Compatible) as a Programmer tool
- Step 1 : Launch MPLAB IDE ,(click here to download)

- Step 2 : The MPLAB IDE window opens as shown below

- Step 3 : From MPLAB IDE menu bar select Configure >Select Device as shown below

- Step 4 : Select the device to be programmed from the drop down list and click ‘OK’

- Step 5 : Next from the Menu Bar select Configure >Configuration Bits

- Step 6 : Now remove the ‘tick’ from Configuration Bits set in code and click ‘OK’ for the dialogue box appears as shown below

- Step 7 : Set the ‘Setting‘ for the ‘Category’ as shown below and make sure the configuration Bits set in code is set or ‘tick’

- Step 8 : From menu bar select Programmer >Select Programmer >PICkit 2 as shown below. When we select the option PICkit 2 from Programmer ,in PIC Programmer Lite the TGTP LED glows. If the PIC Programmer didn’t connect automatically when it was selected as a Programmer tool, Programmer >Connect to connect now. The connection status will be visible in the output window.

- Step 9 : MPLAB will add PICkit 2 debug features : (A) the status bar will show PICkit 2 as the debug tool, (B) the programmer menu will change to add PICkit 2 functions and (C) the output window will display the communication status between the PIC Programmer Lite and the target board on the PICkit 2 tab. Depending on the version of the MPLAB IDE software or the selected device, a message may appear indicating that the firmware (PICkit 2 operating system) needs to be updated. MPLAB IDE will automatically install new firmware.

- Step10 : Import a compiled program (hex file) to program the target device by selecting File >Import

- Step 11 : Load a hex file from desired folder

- Step 12 : Click over the icon to program the target device as shown below. In PIC Programmer Lite the BUSY LED glows at the time of programming.

- Step 13 : When the program gets loaded successfully , the window will be as shown below
 Now disconnect PIC Programmer Lite(MPLAB Compatible). The controller can be used for the desired application.
Selecting PIC Programmer Lite(MPLAB Compatible) as a Debug tool
- Step 14 : Repeat steps 1 to 7 if user is getting started to use PIC Programmer Lite as a Debug tool from start up of MPLAB IDE

- Step 15 : Create a project in MPLAB IDE after completing the code ,saving it in .c file and build the code using the built icon as shown below, hex file will be automatically developed. [Note: if you import a file from File >Import ,other than creating and building the code the hex file debugging will be of the imported file]

- Step 16 : From menu bar Select Debugger >Select Tool >PICkit 2 (or) if the PIC Programmer Lite didn’t connect automatically when it was selected as a debug tool, Debugger >Connect to connect now.The connection status will be visible in the output window.

- Step 17 : MPLAB IDE will add PICkit 2 debug features: (A)the status bar will show PICkit 2 as the debug tool, (B) a PICkit 2 debug tool will be added, (C) the Debugger menu will change to add PICkit 2 debug functions [showned as in Step 3] and (D) the output window will display communication status between the PIC Programmer Lite and the target on the PICkit 2 tab.Depending on the version of the MPLAB IDE software or the selected device, a message may appear indicating that the firmware (PICkit 2 operating system) needs to be updated.MPLAB IDE will automatically install new firmware.

- Step 18 : Now Program the target device using the icon as shown below, thus entered in debug mode. In PIC Programmer Lite the BUSY LED glows at the time of debugging.

- Step 19 : Mark one break point in the c file to debug the code and Run the code using the icon in the Debug tool bar as shown below

- Step 20 : Thus debug the code successfully (green arrow mark ) to the break point given; from the output window we finalize that the code run and the target get halted.

Now we can disconnect the PIC Programmer Lite and check the debug code for further application
Using PIC Programmer Lite to retrieve a program from the controller
Step1: Using MPLAB connect the target as programmer
[ Programmer > Select Programmer > Pickit 2 / Programmer > Connect ].
Then read the program as Programmer > Read or click icon, the output window displays as shown below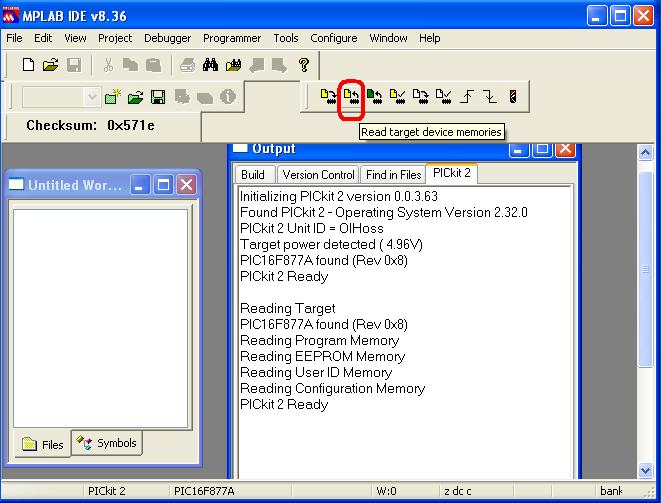 If necessary read the EEDATA memory as Programmer > Read EEDATA or click icon, the output obtained as shown below
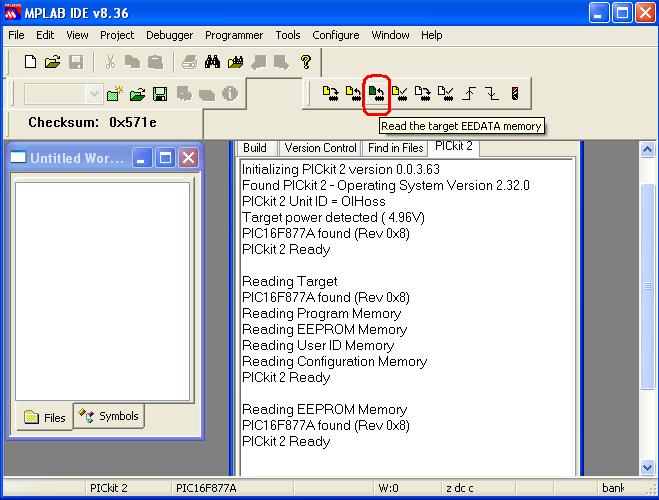
Step2: When PICkit 2 is ready to read, export the file File < Export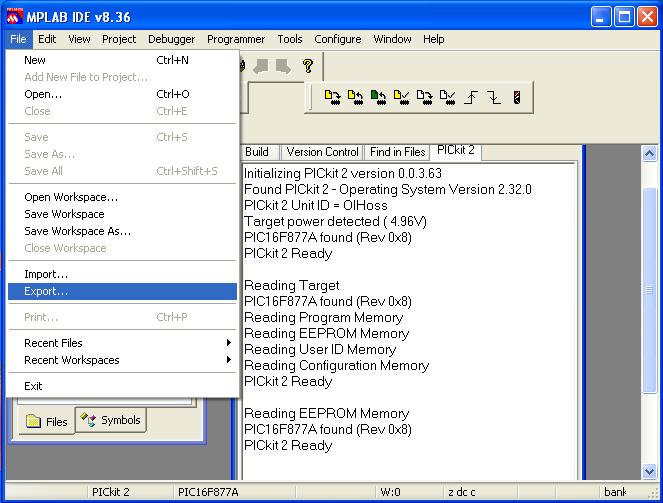
Step3: A small window opens as shown below, in this mark the necessary options and click ‘OK‘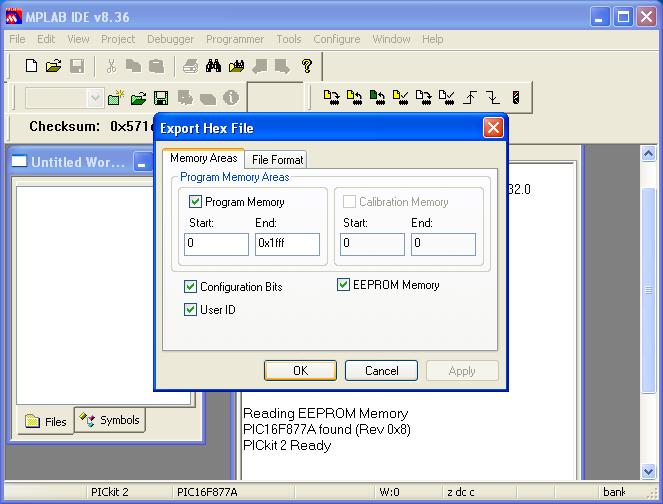
Step4: Save the hex file in a desired folder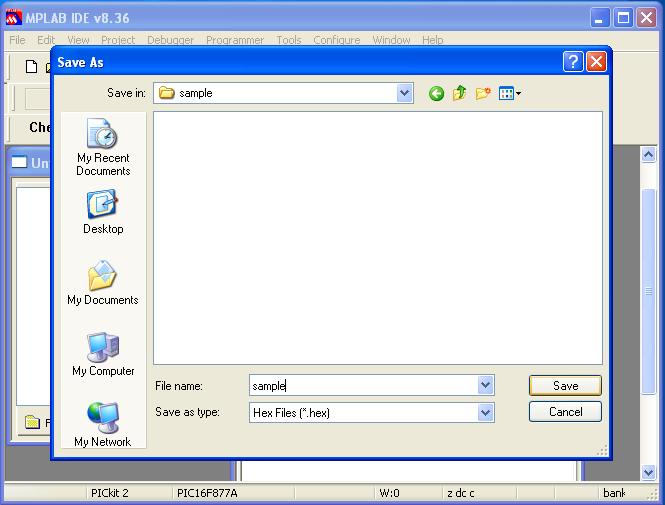
Step5: Thus retrieve the hex file from the controller, now use it for desired purpose.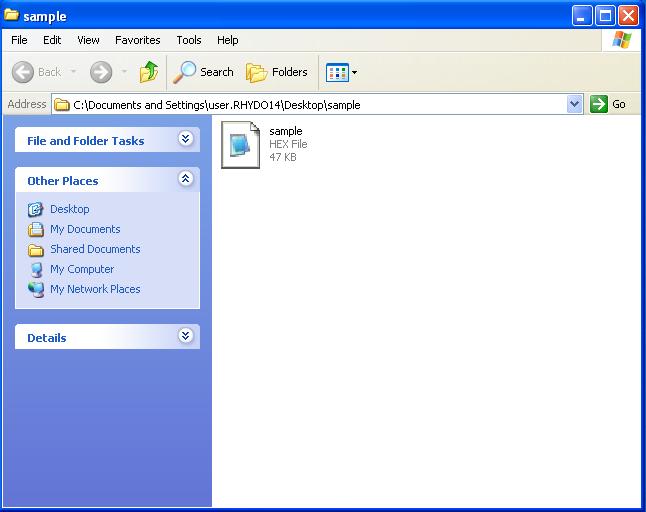
Resources :
How to Buy :
- Click here to buy PIC Programmer Lite(MPLAB Compatible)
- Click here to buy PICKIT2 Programmer
Support :
Please share your ideas with us, visit our forum for discussion
Frequently Asked Questions(FAQ):
Q.Is it possible to use PIC Programmer Lite(MPLAB Compatible) as a debugger?
Ans.Yes. PIC Programmer Lite(MPLAB Compatible) can be used as a programmer and a debugger
Q.Is it necessary to disconnect the PICKIT2 Programmer after loading the hex code to controller?
Ans.Yes. it is necessary to disconnect the Programmer.
Leave a Reply
You must be logged in to post a comment.