AVR ATmega32 Mini Development Board – Interfacing Switches
The board has 3 switches (SW1,SW2 & SW3) connected to port pins PD2, PD3 & PD4 via jumpers J7, J8 & J9 respectively. On shorting these jumpers, the switches can be used as pull_up keys and if they are left open, then the port pins can be used independently.
Sample code to test the switches is given below. In the code, switch press is detected by polling and upon pressing a switch, its name(SW1,SW2 or SW3) gets displayed on the LCD.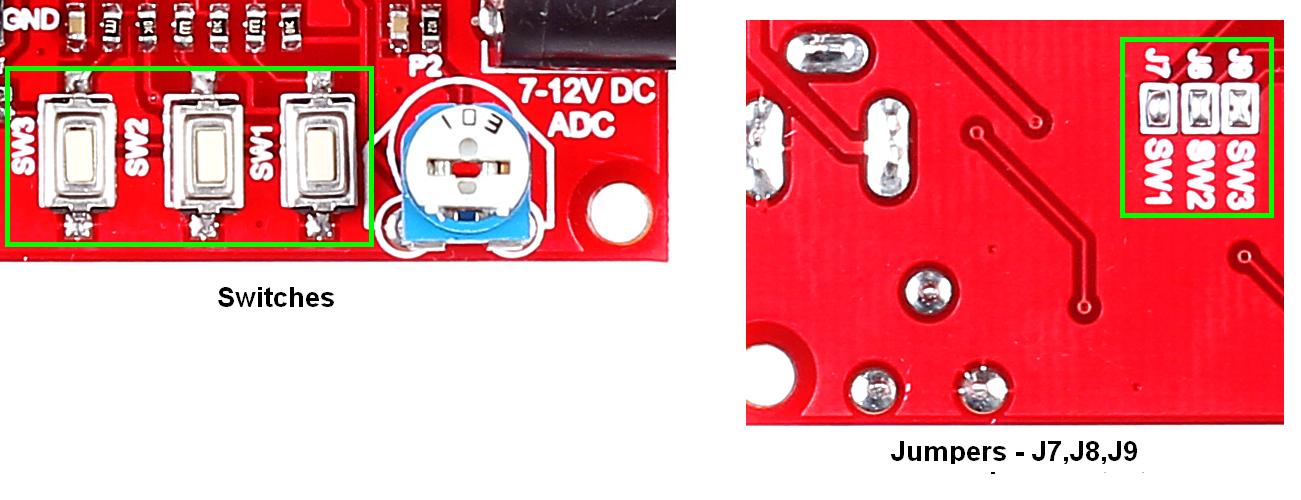
Note: To use switches, don’t forget to short the corresponding jumpers J7, J8 & J9. Leaving them open frees PD2, PD3 & PD4 and can be used for any other desired purpose.
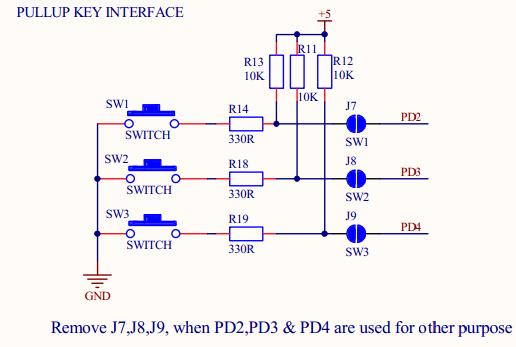
Schematic![]()
Sample Code![]()
|
1 2 3 4 5 6 7 8 9 10 11 12 13 14 15 16 17 18 19 20 21 22 23 24 25 26 27 28 29 30 31 32 33 34 35 36 37 38 39 40 41 42 43 44 45 46 47 48 49 50 51 52 53 54 55 56 57 58 59 60 61 62 63 64 65 66 67 68 69 70 71 72 73 74 75 76 77 78 79 80 81 82 83 84 85 86 87 88 89 90 91 92 93 94 95 96 97 98 99 100 101 102 103 104 105 106 107 108 109 110 111 112 113 114 115 116 117 118 119 |
/********************************************************************************* HEADER FILES **********************************************************************************/ #define F_CPU 8000000UL /* Crystal freq 8 MHz */ #include<avr/io.h> #include<util/delay.h> /********************************************************************************* FUNCTION DECLARATIONS **********************************************************************************/ void Command(unsigned char cmd); void Data(unsigned char dat); void Display(char loc, const char *LCD); /********************************************************************************* MAIN FUNCTION **********************************************************************************/ int main() { volatile char a=0; DDRB = 0xFF; /* LCD data lines(PORTB) configured as o/p */ DDRD = 0X62; /* LCD Control lines-RS(PD5), EN(PD6) -> o/p PD2-PD4 (keys) -> i/p */ PORTD = 0x1C; /* Set PD2-PD4 high */ _delay_us(15); /* Min Delay To Power LCD to Rx Mode */ Command(0x30); /* LCD Specification Command */ _delay_us(5); Command(0x30); /* LCD Specification Command */ _delay_us(2); Command(0x30); /* LCD Specification Command */ Command(0x38); /* Double Line Display Command */ Command(0x06); /* Auto Increment Location Command */ Command(0x0C); /* Display ON Command */ Command(0x01); /* Clear Display Command */ _delay_us(1200); Display(0x80, " Press Key : "); while(1) { Command(0x8D); a = PIND & 0X1C; /* PORTD reads 1C when all keys released */ if( a != 0X1C ) /* Check if any key is pressed */ { _delay_ms(100); if (a==0x18) /* True when the 1st key(SW1) is pressed */ { Data('1'); /* Display on LCD */ _delay_us(50); while(( PIND & 0X1C) != 0X1C); /* Wait here till the key is released */ } else if(a==0x14) /* True when the 2nd key(SW2) is pressed */ { Data('2'); /* Display on LCD */ _delay_us(50); while( ( PIND&0X1C) != 0X1C); /* Wait here till the key is released */ } else if(a==0X0C) /* True when the 3rd key(SW3) is pressed */ { Data('3'); /* Display on LCD */ _delay_us(50); while( ( PIND&0X1C) != 0X1C); /* Wait here till the key is released */ } } } } /********************************************************************************* * Function : Command * * * * Description : Function to give a command to LCD * * * * Parameters : cmd - command to be given * **********************************************************************************/ void Command(unsigned char cmd) { PORTD |= 0X40; /* RS-0 for command register, E-1,Enable pin made high */ PORTB = cmd; /* Command loaded to data lines */ _delay_us(50); PORTD = 0X00; /* E-0, Enable pin made low */ } /********************************************************************************* * Function : Data * * * * Description : Function to display single character on LCD * * * * Parameters : dat - character to be displayed * **********************************************************************************/ void Data(unsigned char dat) { PORTD |= 0X60; /* RS-1 for data register, E-1,Enable pin made high */ PORTB = dat; /* Data loaded to data lines */ _delay_us(50); PORTD = 0X00; /* E-0, Enable pin made low */ } /********************************************************************************* * Function : Display * * * * Description : Function to display string on LCD * * * * Parameters : loc - location * * String to be displayed * **********************************************************************************/ void Display(char loc, const char *LCD) { Command(loc); /* Address of location to display data */ while(*LCD!='\0') /* Check for termination character */ { Data(*LCD); /* Display the character on LCD */ LCD++; /* Increment the pointer */ } } /********************************************************************************* END OF PROGRAM **********************************************************************************/ |
Topics related to AVR ATmega32 Mini Development Board![]()
- AVR ATmega32 Mini Development Board – Overview
- AVR ATmega32 Mini Development Board – Interfacing LED
- AVR ATmega32 Mini Development Board – Interfacing LCD
- AVR ATmega32 Mini Development Board – Serial communication(USART)
- AVR ATmega32 Mini Development Board – Interfacing Switch
- AVR ATmega32 Mini Development Board – Interfacing Buzzer
- AVR ATmega32 Mini Development Board – Interfacing POT(ADC)
- AVR ATmega32 Mini Development Board – Interfacing Temperature sensor
- AVR ATmega32 Mini Development Board – Interfacing Servo Motor
- AVR ATmega32 Mini Development Board – Interfacing μRFID
Resources![]()
How to buy?![]()
- Click here to buy rhydoLABZ AVR ATmega16 Development Board-Mini
- Click here to buy rhydoLABZ AVR ATmega32 Development Board-Mini
Support
![]()
Please share your ideas with us, visit our forum for discussion
Leave a Reply
You must be logged in to post a comment.